Securely connecting external tools to your GCP SQL database
Written by
Tom Gardiner
Last updated on
November 4, 2022
You often need to connect external tools, like MySQLWorkbench, Postico and Trevor.io (disclaimer: I work here) to your Google Cloud Platform SQL database. This is a rapid step-by-step guide on how to do so.
There are two steps required in order to connect to a SQL database on GCP:
- Identify the connection parameters to use.
- Permit connections to your database from your local machine or tool of choice.
Identify the connection parameters
The connection parameters you are looking for are:
Host
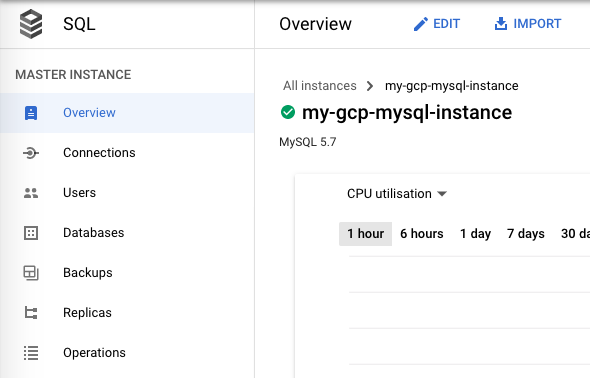
Assuming you have successfully created and started your database instance on the Google Cloud Platform console, you will be presented with a screen giving an overview of your database instance.

As you can see (above) ours is a MySQL database instance (yours may be Postgres or SQL Server).
If you scroll down a little on this page you will find a section labelled "Public IP address".

This is the Host you should use for connecting.
Port
The Port depends on the database type you are using:
- For Postgres the default port is 5432.
- For MySQL the default port is 3306.
- For SQL Server the default port is 1433.
Choose the appropriate port (most tools will default to these for you automatically).
User / Password
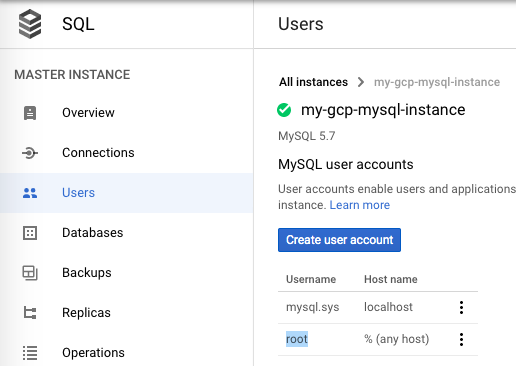
The username and password must be one of the database users listed under "Users" in the Google Cloud Platform console.

We, for example, could use the "root" user here, or click "Create user account" to create a new database user with limited permissions (recommended).
Database
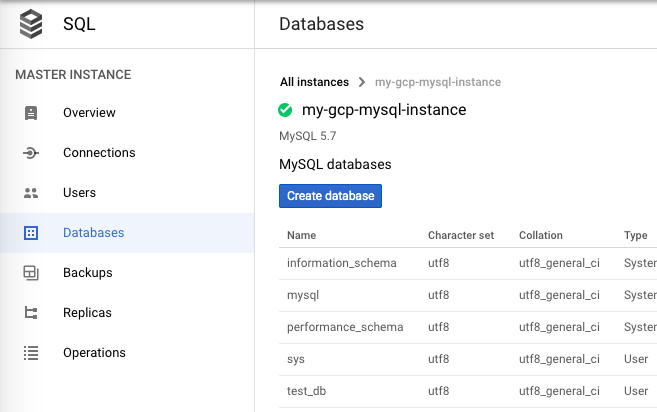
The database (AKA schema in MySQL) is the particular database on your database server that you want to connect to.

Use one of the databases listed under "Databases" in the Google Cloud Platform console. We could, for example, connect to "test_db" here.
Permit connections
Now that you have all the connection parameters the final step is to actually permit connections to your database from your local machine or tool of choice.
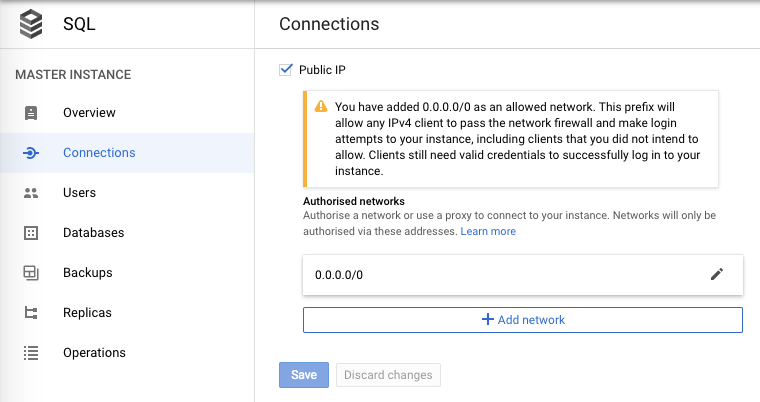
This is done via the "Connections" tab in Google Cloud Platform.

Here you can see that we have added 0.0.0.0/0 as an "Authorised network". This means that connections from anywhere in the world (including from your local computer) are permitted to connect to your database. This is the quickest and easiest way to connect external tools to your database, but it is also the least secure (anyone with access to your database credentials would be able to connect to your database).
If you type "what is my IP" into google you will see what the IP address of your local computer is and you can use just this as an Authorised network.
E.g. if you IP address is 185.199.104.14, you would type 185.199.104.14/32 into the box. Then click "Save".
Common mistake: don't forget to click "Save" in GCP after adding a Network. Until you do, the authorized networks will not be updated.

Here (above) we have added Trevor.io's two public IP addresses as Authorised networks. This will allow Trevor.io to connect to your database.
Success
You now have all the details you need to successfully connect external tools to your Google Cloud Platform SQL database (Postgres, MySQL or SQL Server).
Why not try connecting one of these great tools:
- Postico
- MySQLWorkbench
- Trevor.io (disclaimer: this is our blog ;))
If this article was helpful to you, please share it with friends / colleagues.


